Open topic with navigation
Sending E-Mails
- E-Mails can be sent directly from the system. This eliminates the need to change applications to send an e-mail to a contact.
- Before being able to send out e-mails, information needs to be entered for the Division and User. Refer to Shared Tab: Collaboration
- E-Mails can be sent out to multiple recipients and can be cross referenced to other Entities in the system.
- Fields from the Contact table can be placed directly into the E-Mail body, giving the E-Mail a more personal feel.
- E-Mails can be imported into the system by dragging and dropping an e-mail from a mail compatible application such as Microsoft Outlook.
Menu
Mandatory Prerequisites
Prior to creating an E-Mail, refer to the following Topics:
Screenshot and Field Descriptions: E-Mail Tab
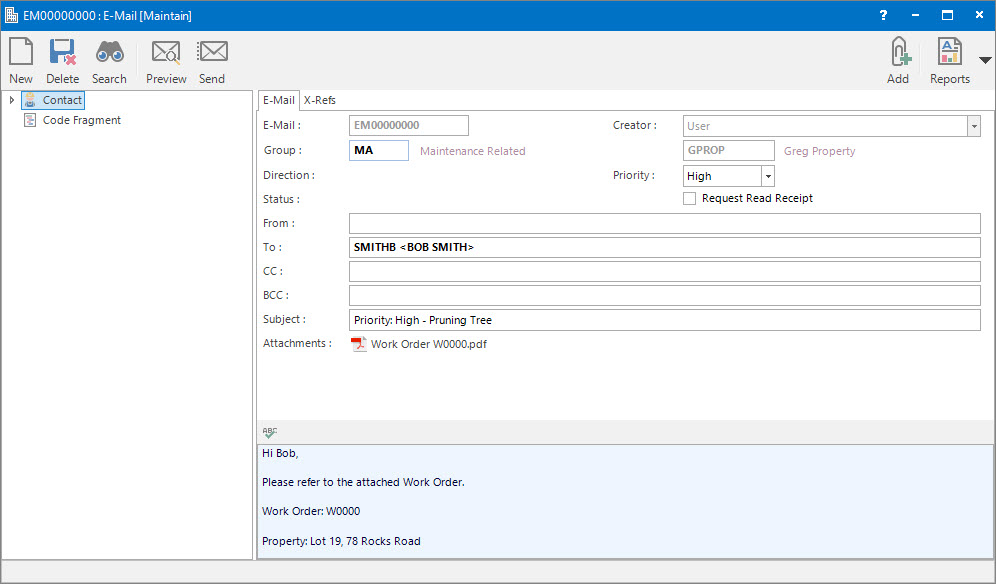
 E-Mail: this is the primary identifier for the record.
Group: this determines the CRM Group that the record belongs to. Groupings are useful in searches and reports.
Direction: this is a reference only field that displays the direction of the E-Mail once it is sent (Outgoing) or received (Incoming).
Status: this is a reference only field that displays the status of the E-Mail ie. Sent, Received, etc.
Creator: this is the E-Mail's creator. Typically, the User.
Priority: this is a drop down list of priority options for the E-Mail.
Request Read Receipt: click this check box to trigger a return E-Mail advice when the message has been read.
From: this is a reference only field that displays the sender of the E-Mail.
To: these are the Contacts / Recipients of the E-Mail.
An E-Mail will be created and sent for each Contact in the To field.
 CC: these are the Contacts / Recipients that are CCed in the E-Mail.
BCC: these are the Contacts / Recipients that are BCCed in the E-Mail.
An E-Mail address can be typed directly into the To, CC or BCC fields.
 Subject: this is the subject of the E-Mail.
Attachments: these are the files attached to the E-Mail.
Body: this is the text of the E-Mail. Click the spell-check button associated with this field to check the spelling of the text entered.
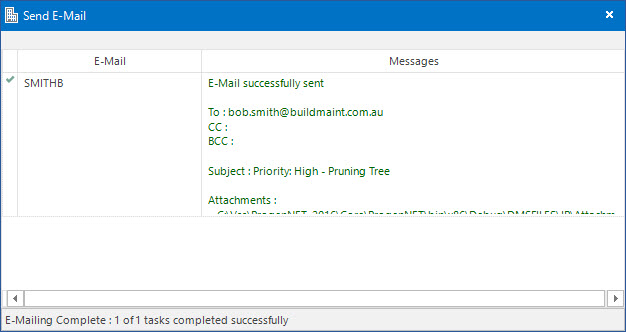
Screenshot and Field Descriptions: Send E-Mail
- The Send E-Mail screen will display when the Application tool-bar push button: Send or Application tool-bar push button: Preview is clicked.
- Previewing an E-Mail before sending is a convenient way to verify that the E-Mail details are correct.
Shared or Site Optional Tabs
Other than Tabs described specifically in this Topic, the following may also be available (depending on Site Settings):
How Do I : Create and Send E-Mails
- At the E-Mail field, enter a new E-Mail ID.
- At the Group field, locate the CRM Group you would
like to assign this E-Mail to.
- At the To field, locate the Contacts to send the E-Mail to. Alternatively, enter in E-Mail addresses.
- At the CC field, locate the Contacts to CC into the E-Mail. Alternatively, enter in E-Mail addresses.
- At the BCC field, locate the Contacts to BCC into the E-Mail. Alternatively, enter in E-Mail addresses.
- At the Subject field, enter the subject of the E-Mail.
- Refer to How Do I : Add an Attachment to an E-Mail to attach files to the E-Mail.
- Enter the required information to be communicated in the Body field.
- Change the default value in the Priority drop down list if required.
- Click the Request Read Receipt check box if you require a notification that the E-Mail has been read.
- Refer to How Do I : Add a Cross Reference to link a CRM record to an Entity to add Cross References.
- To preview the E-Mail before sending, click the Application tool-bar push button: Preview to ensure that the details are correct.
- If the E-Mail is ready to be sent now, click the Application tool-bar push button: Send to send it. If the E-Mail is not ready to be sent now and needs to be saved for later, click the Application tool-bar push button: Add and confirm you wish to add the record.
E-Mails that are added but not sent can be used as Templates for creating E-Mails from other functions in the system, eg. Distribution List.
How Do I : Modify an existing E-Mail
If an E-Mail has already been sent, it can't be sent again.
- At the E-Mail field, locate the E-Mail.
- Change the fields as required.
- Refer to How Do I : Modify an existing Cross Reference linking a CRM record to an Entity to change Cross References or How Do I : Delete an existing Cross Reference linking a CRM record to an Entity to remove Cross References.
- Click the Application tool-bar push button: Change.
- Confirm that you wish to change the record.
How Do I : Delete an existing E-Mail
- At the E-Mail field, locate the E-Mail.
- Click the Application tool-bar push button: Delete.
- Confirm that you wish to delete the record.
How Do I : Add an Attachment to an E-Mail
- Click the Application tool-bar push button: Add to launch the Add Attachments dialog box.
- Locate the required file(s) and click the Open button.
- The file(s) will be added to the Attachments field.
- Attachments can be deleted by clicking on the file in the Attachments field, then clicking the Application tool-bar push button: Delete.
- Attachments can be opened by clicking on the file in the Attachments field, then clicking the Application tool-bar push button: Open.
Attachments are only saved with the record if the Document Management area of the system is set up.
How Do I : Drag / Drop an E-Mail from Microsoft Outlook
- From your mail application, eg. Microsoft Outlook, drag an E-Mail with the mouse, then drop it into the main MDI window of the system. The E-Mail screen will open displaying the details of the E-Mail.
- At the Group field, locate the CRM Group you would
like to assign this E-Mail to.
- Refer to How Do I : Add a Cross Reference to link a CRM record to an Entity to add Cross References.
- Click the Application tool-bar push button: Add.
- Confirm that you wish to add the new record.
Related Topics
E-Mails are associated with the following Topics: